Date of the subject: 28th Sept 2019.
 |
| (Original. Mi A3. 1/120. ISO 194) |
Today the subject is more of a 'how' rather than 'where'. This is not a travel blog for now. I am gonna be writing about the sunset we witnessed and how we set about to captured it, and later edit it. Editing is a part of photography. You can't separate those two. Mind you, editing is done to make the picture resemble the actual scenery and not to give over-dramatic effects. But sadly, we are seeing a lot of the latter rather than the former.
Without further whining, we shall start.
 |
| (Original - unedited. Mi A3. 1/20. ISO 616) |
The first things to look for are cropping and straightening. You can't always get the perfect composition while capturing the image. And sometimes the image might be tilting sideways. You need to correct this before proceeding further.
But in this picture, I didn't have to crop or straighten the image. So, I proceeded to first adjust the 'lights'.
1. Light - Most of the time you're better off with tapping the "auto" and let it do its work. And if you don't find it satisfying you can always do it yourself. In this, I gave "auto" and after that, took highlights down even further. Increased exposure a bit.
2(a). If you select "mix" in the same menu, you will end up in a setting to adjust the hue, saturation, and lightness of different colors. This is more important than you think. More often than not yellow ends up being the dominant color, while in reality, it will be orange/pink. We can adjust that here.
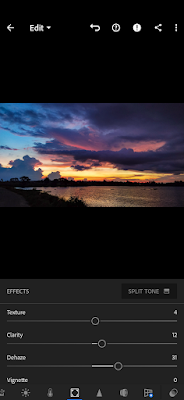
As you can see in the above pictures how changing the hue changes the image significantly.3. Effects - This is my favorite part. First up is texture. It increases the clarity of the image, but mainly on the focused parts of the image. Next is clarity, which increases the clarity of the whole image. (Technically both are a bit more complicated than that. But let's not go into that now). "Dehaze" option. What it basically does is removes daze from the pic. But it's not as simple as that. I've found it to be quite useful in sunset pictures. It adds that extra punch to the picture and makes the cloud look a bit more dramatic. And it's important here to not overdo it (I know I'm telling that to every adjustment. But it's important).
4. Detail - In this section, you have sharpening and noise reduction mainly. Sharpening is important for images taken on mobile phones since mobile camera apps tend to soften the edges a lot and you lose a lot of details. And sharpening is not the same as the clarity option. Noise reduction reduces the noise in the image. Noises are small dots you see in the pictures, especially in the pictures taken at night. But use this carefully since it will make the picture more soft resulting in loss of details.
Okay. That's it. And voila:
 |
| (Original and Edited) |
| (Original and edited. Mi A3. 1/120. ISO 194) |
 |
| (Original and edited. Mi A3. 1/125. ISO 100) |
 |
| (Original and edited. Mi A3. 1/250. ISO 100) |
Thank you and goodbye. Have a great weekend!


This is so helpful!
ReplyDeleteJust happy to help :)
DeleteThat's helpful!! Make more of these
ReplyDeleteYes. I will. Thank you for your support!
DeleteThanks master ji for the awesome tips. Hope to see more of these. Lots of learning. Thank you. Keep it up.
ReplyDeleteThank you! But this is nothing that you already didn't know.
DeleteLoved it, please keep posting more of such stuff 😍
ReplyDeleteThank you very much. Sure I'll post things like these :)
Delete